The heapq Module

This module provides functions to add and remove items from partially sorted sequences.

The functions in this module all assume that the sequence is sorted so that the first item in the sequence (seq[0]) is the smallest, and that the rest of the sequence forms a binary tree, where the children of seq[i] are seq[2i+1] and seq[2i+2]. When modifying the sequence, the functions always make sure that the children are equal to or larger than their parent.

Given an empty sequence, you can use heappush to add items to the sequence, and heappop to remove the smallest item from the sequence.

# File: heapq-example-1.py

import heapq

heap = []

# add some values to the heap
for value in [20, 10, 30, 50, 40]:
    heapq.heappush(heap, value)

# pop them off, in order
while heap:
    print heapq.heappop(heap),

$ python heapq-example-1.py
10 20 30 40 50

(This is a lot more efficient than using min to get the smallest item, and the remove and append methods to modify the sequence.)

If you have an existing sequence, you can use the heapify function to turn it into a well-formed heap:

# File: heapq-example-2.py

import heapq

heap = [20, 10, 30, 50, 40]

heapq.heapify(heap)

# pop them off, in order
while heap:
    print heapq.heappop(heap),
$ python heapq-example-2.py
10 20 30 40 50

Note that if you have a sorted list, you don’t really have to call the heapify function; a sorted list is a valid heap tree. Also note that an empty list and a list with only one item both qualify as “sorted”.

The heapq module can be used to implement various kind of priority queues and schedulers (where the item value represents a process priority or a timestamp).

Python debugging with PyDev and eclipse neon

Today we are gonna go through how to install PyDev on eclipse neon.

The best part of it is, it supports debugging in Python very similar to C programs where you start form main() method.

[1] Install Eclipse neon

You can download eclipse as package by clicking here, then you just need to extract it at your desired location and launch eclipse by clicking the eclipse.exe in your extracted folder.

The alternate way is to go to eclipse.org and download eclipse according to your hardware flavor i.e. 32 or 64 bit, you have options to download it as package or installer.

[2] Install PyDev on eclipse

PyDev brings support for working with Python files to Eclipse. Installing the PyDev plugin for Eclipse is very easy:

  • Go to Help -> Install New Software. Click on Add and add http://pydev.org/updates if you want the Stable version or http://pydev.org/nightly if you want the bleeding edge versions.
  • PyDev appears in the list below, choose it and follow through the dialog, giving it install permissions and it will be installed. You will need to restart Eclipse to use PyDev.
  • After installing PyDev, the first thing you wanna do is to enable PyDev debug feature which will help in debugging python scripts.

    Add Pydev Start/Stop debug server buttons

    • In the menu bar select Window -> Customize perspective…, a window Customize Perspective – PyDev will open
    • Select Command Groups Availability Tab
    • Check Pydev Debug box and OK
    • You should see 2 new buttons in your toolbar:

    EclipsePydevDebugSrvButtons.png

And there you go you are now able to debug python scripts in eclipse

Tried with: Eclipse Luna 4.4.1 and Ubuntu 14.04 and Windows 10

PS: post below your comments, if you like this post or face any errors

Cheers

Generators in Python

A generator is simply a function which returns an object on which you can call next, such that for every call it returns some value, until it raises a StopIteration exception, signaling that all values have been generated. Such an object is called an iterator.

Normal functions return a single value using return, just like in Java. In Python, however, there is an alternative, called yield. Using yield anywhere in a function makes it a generator. Observe this code:

>>> def myGen(n):
...     yield n
...     yield n + 1
... 
>>> g = myGen(6)
>>> next(g)
6
>>> next(g)
7
>>> next(g)
Traceback (most recent call last):
  File "<stdin>", line 1, in <module>
StopIteration

As you can see, myGen(n) is a function which yields n and n + 1. Every call to next yields a single value, until all values have been yielded. for loops call next in the background, thus:

>>> for n in myGen(6):
...     print(n)
... 
6
7

Likewise there are generator expressions, which provide a means to succinctly describe certain common types of generators:

>>> g = (n for n in range(3, 5))
>>> next(g)
3
>>> next(g)
4
>>> next(g)
Traceback (most recent call last):
  File "<stdin>", line 1, in <module>
StopIteration

Note that generator expressions are much like list comprehensions:

>>> lc = [n for n in range(3, 5)]
>>> lc
[3, 4]

Observe that a generator object is generated once, but its code is not run all at once. Only calls to next actually execute (part of) the code. Execution of the code in a generator stops once a yieldstatement has been reached, upon which it returns a value. The next call to next then causes execution to continue in the state in which the generator was left after the last yield. This is a fundamental difference with regular functions: those always start execution at the “top” and discard their state upon returning a value.

There are more things to be said about this subject. It is e.g. possible to send data back into a generator (reference). But that is something I suggest you do not look into until you understand the basic concept of a generator.

Now you may ask: why use generators? There are a couple of good reasons:

  • Certain concepts can be described much more succinctly using generators.
  • Instead of creating a function which returns a list of values, one can write a generator which generates the values on the fly. This means that no list needs to be constructed, meaning that the resulting code is more memory efficient. In this way one can even describe data streams which would simply be too large to fit in memory.
  • Generators allow for a natural way to describe infinite streams. Consider for example the Fibonacci numbers:
    >>> def fib():
    ...     a, b = 0, 1
    ...     while True:
    ...         yield a
    ...         a, b = b, a + b
    ... 
    >>> import itertools
    >>> list(itertools.islice(fib(), 10))
    [0, 1, 1, 2, 3, 5, 8, 13, 21, 34]

    This code uses itertools.islice to take a finite number of elements from an infinite stream. You are advised to have a good look at the functions in the itertools module, as they are essential tools for writing advanced generators with great ease.

Using defaultdict in Python

Dictionaries are a convenient way to store data for later retrieval by name (key). Keys must be unique, immutable objects, and are typically strings. The values in a dictionary can be anything. For many applications the values are simple types such as integers and strings.

It gets more interesting when the values in a dictionary are collections (lists, dicts, etc.) In this case, the value (an empty list or dict) must be initialized the first time a given key is used. While this is relatively easy to do manually, the defaultdict type automates and simplifies these kinds of operations.

A defaultdict works exactly like a normal dict, but it is initialized with a function (“default factory”) that takes no arguments and provides the default value for a nonexistent key.

A defaultdict will never raise a KeyError. Any key that does not exist gets the value returned by the default factory.

>>> from collections import defaultdict
>>> ice_cream = defaultdict(lambda: 'Vanilla')
>>>
>>> ice_cream = defaultdict(lambda: 'Vanilla')
>>> ice_cream['Sarah'] = 'Chunky Monkey'
>>> ice_cream['Abdul'] = 'Butter Pecan'
>>> print ice_cream['Sarah']
Chunky Monkey
>>> print ice_cream['Joe']
Vanilla

Be sure to pass the function object to defaultdict(). Do not call the function, i.e. defaultdict(func), not defaultdict(func()).

In the following example, a defaultdict is used for counting. The default factory is int, which in turn has a default value of zero. (Note: “lambda: 0″ would also work in this situation). For each food in the list, the value is incremented by one where the key is the food. We do not need to make sure the food is already a key – it will use the default value of zero.

>>> from collections import defaultdict
>>> food_list = 'spam spam spam spam spam spam eggs spam'.split()
>>> food_count = defaultdict(int) # default value of int is 0
>>> for food in food_list:
...     food_count[food] += 1 # increment element's value by 1
...
defaultdict(<type 'int'>, {'eggs': 1, 'spam': 7})

In the next example, we start with a list of states and cities. We want to build a dictionary where the keys are the state abbreviations and the values are lists of all cities for that state. To build this dictionary of lists, we use a defaultdict with a default factory of list. A new list is created for each new key.

>>> from collections import defaultdict
>>> city_list = [('TX','Austin'), ('TX','Houston'), ('NY','Albany'), ('NY', 'Syracuse'), ('NY', 'Buffalo'), ('NY', 'Rochester'), ('TX', 'Dallas'), ('CA','Sacramento'), ('CA', 'Palo Alto'), ('GA', 'Atlanta')]
>>>
>>> cities_by_state = defaultdict(list)
>>> for state, city in city_list:
...     cities_by_state[state].append(city)
...
for state, cities in cities_by_state.iteritems():
...     print state, ', '.join(cities)
...
NY Albany, Syracuse, Buffalo, Rochester
CA Sacramento, Palo Alto
GA Atlanta
TX Austin, Houston, Dallas

In conclusion, whenever you need a dictionary, and each element’s value should start with a default value, use a defaultdict.

Wanna have some shoes to keep your blood warm and pump it to your brain?

Have a look at these shoes

buynow.jpg

Counting word frequency and making a dictionary from it

Although, using Counter from collections library as suggested is better approach, but counting objects frequencies in run-time is a better approach to save memory, and to avoid duplication and redundancy (I believe that will be an answer for new Python learner):

From comment in your code it seem like you wants to improve your code. And I think you are able to read file content in words (while usually I avoid using read() function and use for line in file_descriptor: kind of code).

As words is a string, In for loop, for i in words: the loop-variable i is not a word but a char. You are iterating over chars in string instead of iterating over words in string words. To understand this notice following code snipe:

>>> for i in "Hi, h r u?":
...  print i
... 
H
i
,

h

r

u
?
>>> 

Because iterating over string char by chars instead word by words is not what you wanted, to iterate words by words you should split method/function from string class in Python.
str.split(str="", num=string.count(str)) method returns a list of all the words in the string, using str as the separator (splits on all whitespace if left unspecified), optionally limiting the number of splits to num.

Notice below code examples:

Split:

>>> "Hi, how are you?".split()
['Hi,', 'how', 'are', 'you?']

loop with split:

>>> for i in "Hi, how are you?".split():
...  print i
... 
Hi,
how
are
you?

And it looks something like you needs. Except word Hi, because split() by default split by whitespaces so Hi, are kept as a single string (and obviously) that you don’t want. To count frequency of words in the file.

One good solution can be that use regex, But first to keep answer simple I answering with replace() method. The method str.replace(old, new[, max]) returns a copy of the string in which the occurrences of old have been replaced with new, optionally restricting the number of replacements to max.

Now check below code example for what I want to suggest:

>>> "Hi, how are you?".split()
['Hi,', 'how', 'are', 'you?'] # it has , with Hi
>>> "Hi, how are you?".replace(',', ' ').split()
['Hi', 'how', 'are', 'you?'] # , replaced by space then split

loop:

>>> for word in "Hi, how are you?".replace(',', ' ').split():
...  print word
... 
Hi
how
are
you?

Now, how to count frequency:

One way is use Counter as @Michael suggested, but to use your approach in which you wants to start from empty dict. Do something like this code:

words = f.read()
wordfreq = {}
for word in .replace(', ',' ').split():
    wordfreq[word] = wordfreq.setdefault(word, 0) + 1
    #                ^^ add 1 to 0 or old value from dict 

What I am doing?: because initially wordfreq is empty you can’t assign to wordfreq[word] at first time(it will rise key exception). so I used setdefault dict method.

dict.setdefault(key, default=None) is similar to get(), but will set dict[key]=default if key is not already in dict. So for first time when a new word comes I set it with 0 in dict using setdefault then add 1 and assign to same dict.

I written an equivalent code using with open instead of single open.

with open('~/Desktop/file') as f:
    words = f.read()
    wordfreq = {}
    for word in words.replace(',', ' ').split():
        wordfreq[word] = wordfreq.setdefault(word, 0) + 1
print wordfreq

That runs like this:

$ cat file  # file is 
this is the textfile, and it is used to take words and count
$ python work.py  # indented manually 
{'and': 2, 'count': 1, 'used': 1, 'this': 1, 'is': 2, 
 'it': 1, 'to': 1, 'take': 1, 'words': 1, 
 'the': 1, 'textfile': 1}

Using re.split(pattern, string, maxsplit=0, flags=0)

Just change for loop: for i in re.split(r"[,\s]+", words):, that should produce correct output.

Edit: better to find all alphanumeric character because you may have more than one punctuation symbols.

>>> re.findall(r'[\w]+', words) # manually indent output  
['this', 'is', 'the', 'textfile', 'and', 
  'it', 'is', 'used', 'to', 'take', 'words', 'and', 'count']

use for loop as: for word in re.findall(r'[\w]+', words):

How would I write code without using read():

File is:

$ cat file
This is the text file, and it is used to take words and count. And multiple
Lines can be present in this file.
It is also possible that Same words repeated in with capital letters.

Code is:

$ cat work.py
import re
wordfreq = {}
with open('file') as f:
    for line in f:
        for word in re.findall(r'[\w]+', line.lower()):
            wordfreq[word] = wordfreq.setdefault(word, 0) + 1

print wordfreq

Used lower() to convert upper letter to lower.

output:

$python work.py  # manually strip output  
{'and': 3, 'letters': 1, 'text': 1, 'is': 3, 
 'it': 2, 'file': 2, 'in': 2, 'also': 1, 'same': 1, 
 'to': 1, 'take': 1, 'capital': 1, 'be': 1, 'used': 1, 
 'multiple': 1, 'that': 1, 'possible': 1, 'repeated': 1, 
 'words': 2, 'with': 1, 'present': 1, 'count': 1, 'this': 2, 
 'lines': 1, 'can': 1, 'the': 1}

Named tuple in python

namedtuple

The standard tuple uses numerical indexes to access its members.

bob = ('Bob', 30, 'male')
print 'Representation:', bob

jane = ('Jane', 29, 'female')
print '\nField by index:', jane[0]

print '\nFields by index:'
for p in [ bob, jane ]:
    print '%s is a %d year old %s' % p

This makes tuples convenient containers for simple uses.

$ python collections_tuple.py

Representation: ('Bob', 30, 'male')

Field by index: Jane

Fields by index:
Bob is a 30 year old male
Jane is a 29 year old female

On the other hand, remembering which index should be used for each value can lead to errors, especially if the tuple has a lot of fields and is constructed far from where it is used. A namedtuple assigns names, as well as the numerical index, to each member.

Defining

namedtuple instances are just as memory efficient as regular tuples because they do not have per-instance dictionaries. Each kind of namedtuple is represented by its own class, created by using the namedtuple() factory function. The arguments are the name of the new class and a string containing the names of the elements.

import collections

Person = collections.namedtuple('Person', 'name age gender')

print 'Type of Person:', type(Person)

bob = Person(name='Bob', age=30, gender='male')
print '\nRepresentation:', bob

jane = Person(name='Jane', age=29, gender='female')
print '\nField by name:', jane.name

print '\nFields by index:'
for p in [ bob, jane ]:
    print '%s is a %d year old %s' % p
    

As the example illustrates, it is possible to access the fields of the namedtuple by name using dotted notation (obj.attr) as well as using the positional indexes of standard tuples.

$ python collections_namedtuple_person.py

Type of Person: <type 'type'>

Representation: Person(name='Bob', age=30, gender='male')

Field by name: Jane

Fields by index:
Bob is a 30 year old male
Jane is a 29 year old female

Invalid Field Names

As the field names are parsed, invalid values cause ValueError exceptions.

import collections

try:
    collections.namedtuple('Person', 'name class age gender')
except ValueError, err:
    print err

try:
    collections.namedtuple('Person', 'name age gender age')
except ValueError, err:
    print err
    

Names are invalid if they are repeated or conflict with Python keywords.

$ python collections_namedtuple_bad_fields.py

Type names and field names cannot be a keyword: 'class'
Encountered duplicate field name: 'age'

In situations where a namedtuple is being created based on values outside of the control of the programm (such as to represent the rows returned by a database query, where the schema is not known in advance), set the rename option to True so the fields are renamed.

import collections

with_class = collections.namedtuple('Person', 'name class age gender', rename=True)
print with_class._fields

two_ages = collections.namedtuple('Person', 'name age gender age', rename=True)
print two_ages._fields

The field with name class becomes _1 and the duplicate age field is changed to _3.

$ python collections_namedtuple_rename.py

('name', '_1', 'age', 'gender')
('name', 'age', 'gender', '_3')

*args and **kwargs in python explained

Hi there folks. I have come to see that most new python programmers have a hard time figuring out the *args and **kwargs magic variables. So what are they ? First of all let me tell you that it is not necessary to write *args or **kwargs. Only the * (aesteric) is necessary. You could have also written *var and **vars. Writing *args and **kwargs is just a convention. So now lets take a look at *args first.

Usage of *args
*args and **kwargs are mostly used in function definitions. *args and **kwargs allow you to pass a variable number of arguments to a function. What does variable mean here is that you do not know before hand that how many arguments can be passed to your function by the user so in this case you use these two keywords. *args is used to send a non-keyworded variable length argument list to the function. Here’s an example to help you get a clear idea:

def test_var_args(f_arg, *argv):
    print "first normal arg:", f_arg
    for arg in argv:
        print "another arg through *argv :", arg

test_var_args('yasoob','python','eggs','test')

This produces the following result:

first normal arg: yasoob
another arg through *argv : python
another arg through *argv : eggs
another arg through *argv : test

I hope this cleared away any confusion that you had. So now lets talk about **kwargs

Usage of **kwargs
**kwargs allows you to pass keyworded variable length of arguments to a function. You should use **kwargs if you want to handle named arguments in a function. Here is an example to get you going with it:

def greet_me(**kwargs):
    if kwargs is not None:
        for key, value in kwargs.iteritems():
            print "%s == %s" %(key,value)
 
>>> greet_me(name="yasoob")
name == yasoob

So can you see how we handled a keyworded argument list in our function. This is just the basics of **kwargs and you can see how useful it is. Now lets talk about how you can use *args and **kwargs to call a function with a list or dictionary of arguments.

Using *args and **kwargs to call a function
So here we will see how to call a function using *args and **kwargs. Just consider that you have this little function:

def test_args_kwargs(arg1, arg2, arg3):
    print "arg1:", arg1
    print "arg2:", arg2
    print "arg3:", arg3

Now you can use *args or **kwargs to pass arguments to this little function. Here’s how to do it:

# first with *args
>>> args = ("two", 3,5)
>>> test_args_kwargs(*args)
arg1: two
arg2: 3
arg3: 5

# now with **kwargs:
>>> kwargs = {"arg3": 3, "arg2": "two","arg1":5}
>>> test_args_kwargs(**kwargs)
arg1: 5
arg2: two
arg3: 3

Order of using *args **kwargs and formal args
So if you want to use all three of these in functions then the order is

some_func(fargs,*args,**kwargs)

I hope you have understood the usage of *args and **kwargs. If you have got any problems or confusions with this then feel free to comment below. For further study i suggest the official python docs on defining functions and *args and **kwargs on stackoverflow.

Gerrit and Git goes hands in hand

Gerrit is a web-based code review tool built on top of the git version control system, but if you’ve got as far as reading this guide then you probably already know that. The purpose of this introduction is to allow you to answer the question, is Gerrit the right tool for me? Will it fit in my work flow and in my organization?

What is Gerrit?

It is assumed that if you’re reading this then you’re already convinced of the benefits of code review in general but want some technical support to make it easy.

Code reviews mean different things to different people. To some it’s a formal meeting with a projector and an entire team going through the code line by line. To others it’s getting someone to glance over the code before it is committed.

Gerrit is intended to provide a lightweight framework for reviewing every commit before it is accepted into the code base. Changes are uploaded to Gerrit but don’t actually become a part of the project until they’ve been reviewed and accepted. In many ways this is simply tooling to support the standard open source process of submitting patches which are then reviewed by the project members before being applied to the code base. However Gerrit goes a step further making it simple for all committers on a project to ensure that changes are checked over before they’re actually applied. Because of this Gerrit is equally useful where all users are trusted committers such as may be the case with closed-source commercial development. Either way it’s still desirable to have code reviewed to improve the quality and maintainability of the code. After all, if only one person has seen the code it may be a little difficult to maintain when that person leaves.

Gerrit is firstly a staging area where changes can be checked over before becoming a part of the code base. It is also an enabler for this review process, capturing notes and comments about the changes to enable discussion of the change. This is particularly useful with distributed teams where this conversation can’t happen face to face. Even with a co-located team having a review tool as an option is beneficial because reviews can be done at a time that is convenient for the reviewer. This allows the developer to create the review and explain the change while it is fresh in their mind. Without such a tool they either need to interrupt someone to review the code or switch context to explain the change when they’ve already moved on to the next task.

This also creates a lasting record of the conversation which can be useful for answering the inevitable “I know we changed this for a reason” questions.

Where does Gerrit fit in?

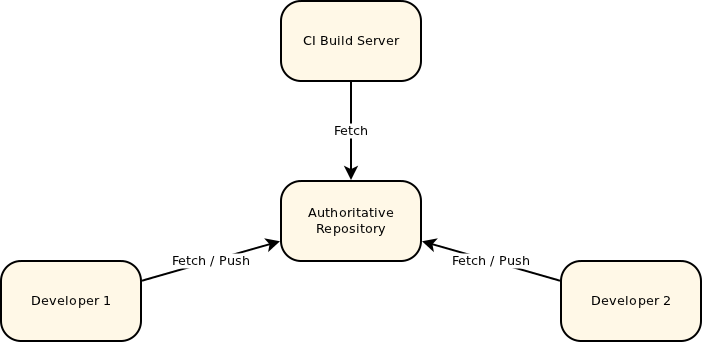
Any team with more than one member has a central source repository of some kind (or they should). Git can theoretically work without such a central location but in practice there is usually a central repository. This serves as the authoritative copy of what is actually in the project. This is what everyone fetches from and pushes to and is generally where build servers and other such tools get the source from.

Authoritative Source Repository
Figure 1. Central Source Repository

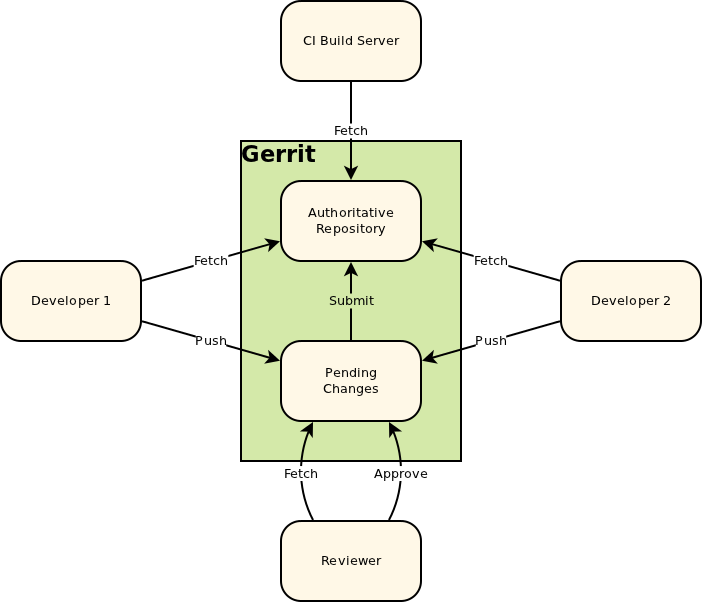
Gerrit is deployed in place of this central repository and adds an additional concept, a store of pending changes. Everyone still fetches from the authoritative repository but instead of pushing back to it, they push to this pending changes location. A change can only be submitted into the authoritative repository and become an accepted part of the project once the change has been reviewed and approved.

Gerrit in place of Central Repository
Figure 2. Gerrit in place of Central Repository

Like any repository hosting solution, Gerrit has a powerful access control model. Users can even be granted access to push directly into the central repository, bypassing code review entirely. Gerrit can even be used without code review, used simply to host the repositories and controlling access. But generally it’s just simpler and safer to go through the review process even for users who are allowed to directly push.

The Life and Times of a Change

The easiest way to get a feel for how Gerrit works is to follow a change through its entire life cycle. For the purpose of this example we’ll assume that the Gerrit Server is running on a server called gerrithost with the HTTP interface on port 8080 and the SSH interface on port 29418. The project we’ll be working on is called RecipeBook and we’ll be developing a change for the master branch.

Cloning the Repository

Obviously the first thing we need to do is get the source that we’re going to be modifying. As with any git project you do this by cloning the central repository that Gerrit is hosting. e.g.

$ git clone ssh://gerrithost:29418/RecipeBook.git RecipeBook
Cloning into RecipeBook...

Then we need to make our actual change and commit it locally. Gerrit doesn’t really change anything here, this is just the standard editing and git. While not strictly required, it’s best to include a Change-Id in your commit message so that Gerrit can link together different versions of the same change being reviewed. Gerrit contains a standard Change-Id commit-msg hook that will generate a unique Change-Id when you commit. If you don’t do this then Gerrit will generate a Change-Id when you push your change for review. But because you don’t have the Change-Id in your commit message you’ll need to manually copy it in if you need to upload another version of your change. Because of this it’s best to just install the hook and forget about it.

Creating the Review

Once you’ve made your change and committed it locally it’s time to push it to Gerrit so that it can be reviewed. This is done with a git push to the Gerrit server. Since we cloned our local repository directly from Gerrit it is the origin so we don’t have to redefine the remote.

$ <work>
$ git commit
[master 9651f22] Change to a proper, yeast based pizza dough.
 1 files changed, 3 insertions(+), 2 deletions(-)
$ git push origin HEAD:refs/for/master
Counting objects: 5, done.
Delta compression using up to 8 threads.
Compressing objects: 100% (2/2), done.
Writing objects: 100% (3/3), 542 bytes, done.
Total 3 (delta 0), reused 0 (delta 0)
remote:
remote: New Changes:
remote:   http://gerrithost:8080/68
remote:
To ssh://gerrithost:29418/RecipeBook.git
 * [new branch]      HEAD -> refs/for/master

The only different thing about this is the refs/for/master branch. This is a magic branch that creates reviews that target the master branch. For every branch Gerrit tracks there is a magic refs/for/<branch_name> that you push to to create reviews.

In the output of this command you’ll notice that there is a link to the HTTP interface of the Gerrit server we just pushed to. This is the web interface where we will review this commit. Let’s follow that link and see what we get.

Gerrit Review Screen
Figure 3. Gerrit Code Review Screen

This is the Gerrit code review screen where someone will come to review the change. There isn’t too much to see here yet, you can look at the diff of your change, add some comments explaining what you did and why, you may even add a list of people that should review the change.

Reviewers can find changes that they want to review in any number of ways. Gerrit has a capable search that allows project leaders (or anyone else) to find changes that need to be reviewed. Users can also setup watches on Gerrit projects with a search expression, this causes Gerrit to notify them of matching changes. So adding a reviewer when creating a review is just a recommendation.

At this point the change is available for review and we need to switch roles to continue following the change. Now let’s pretend we’re the reviewer.

Reviewing the Change

The reviewer’s life starts at the code review screen shown above. He can get here in a number of ways, but for some reason they’ve decided to review this change. Of particular note on this screen are the two “Need” lines:

* Need Verified
* Need Code-Review

Gerrit’s default work-flow requires two checks before a change is accepted. Code-Review is someone looking at the code, ensuring it meets the project guidelines, intent etc. Verifying is checking that the code actually compiles, unit tests pass etc. Verification is usually done by an automated build server rather than a person. There is even a Gerrit Trigger Jenkins Plugin that will automatically build each uploaded change and update the verified score accordingly.

It is important to note that Code-Review and Verification are different permissions in Gerrit, allowing these tasks to be separated. For example, an automated process would have rights to verify but not to code-review.

Since we are the code reviewer, we’re going to review the code. To do this we can view it within the Gerrit web interface as either a unified or side-by-side diff by selecting the appropriate option. In the example below we’ve selected the side-by-side view. In either of these views you can add inline comments by double clicking on the line (or single click the line number) that you want to comment on. Also you can add file comment by double clicking anywhere (not just on the “Patch Set” words) in the table header or single clicking on the icon in the line-number column header. Once published these comments are viewable to all, allowing discussion of the change to take place.

Adding a Comment
Figure 4. Side By Side Patch View

Code reviewers end up spending a lot of time navigating these screens, looking at and commenting on these changes. To make this as efficient as possible Gerrit has keyboard shortcuts for most operations (and even some operations that are only accessible via the hot-keys). At any time you can hit the ? key to see the keyboard shortcuts.

Hot Key Help
Figure 5. Gerrit Hot Key Help

Once we’ve looked over the changes we need to complete reviewing the submission. To do this we click the Review button on the change screen where we started. This allows us to enter a Code Review label and message.

Reviewing the Change
Figure 6. Reviewing the Change

The label that the reviewer selects determines what can happen next. The +1 and -1 level are just an opinion where as the +2 and -2 levels are allowing or blocking the change. In order for a change to be accepted it must have at least one +2 and no -2 votes. Although these are numeric values, they in no way accumulate; two +1s do not equate to a +2.

Regardless of what label is selected, once the Publish Comments button has been clicked, the cover message and any comments on the files become visible to all users.

In this case the change was not accepted so the creator needs to rework it. So let’s switch roles back to the creator where we started.

Reworking the Change

As long as we set up the Change-Id commit-msg hook before we uploaded the change, re-working it is easy. All we need to do to upload a re-worked change is to push another commit that has the same Change-Id in the message. Since the hook added a Change-Id in our initial commit we can simply checkout and then amend that commit. Then push it to Gerrit in the same way as we did to create the review. E.g.

$ <checkout first commit>
$ <rework>
$ git commit --amend
$ git push origin HEAD:refs/for/master
Counting objects: 5, done.
Delta compression using up to 8 threads.
Compressing objects: 100% (2/2), done.
Writing objects: 100% (3/3), 546 bytes, done.
Total 3 (delta 0), reused 0 (delta 0)
remote: Processing changes: updated: 1, done
remote:
remote: Updated Changes:
remote:   http://gerrithost:8080/68
remote:
To ssh://gerrithost:29418/RecipeBook.git
 * [new branch]      HEAD -> refs/for/master

Note that the output is slightly different this time around. Since we’re adding to an existing review it tells us that the change was updated.

Having uploaded the reworked commit we can go back into the Gerrit web interface and look at our change.

Reviewing the Rework
Figure 7. Reviewing the Rework

If you look closely you’ll notice that there are now two patch sets associated with this change, the initial submission and the rework. Rather than repeating ourselves lets assume that this time around the patch is given a +2 score by the code reviewer.

Trying out the Change

With Gerrit’s default work-flow there are two sign-offs, code review and verify. Verifying means checking that the change actually works. This would typically be checking that the code compiles, unit tests pass and similar checks. Really a project can decide how much or little they want to do here. It’s also worth noting that this is only Gerrit’s default work-flow, the verify check can actually be removed or others added.

As mentioned in the code review section, verification is typically an automated process using the Gerrit Trigger Jenkins Plugin or similar. But there are times when the code needs to be manually verified, or the reviewer needs to check that something actually works or how it works. Sometimes it’s just nice to work through the code in a development environment rather than the web interface. All of these involve someone needing to get the change into their development environment. Gerrit makes this process easy by exposing each change as a git branch. So all the reviewers need to do is fetch and checkout that branch from Gerrit and they will have the change.

We don’t even need to think about it that hard, if you look at the earlier screenshots of the Gerrit Code Review Screen you’ll notice adownload command. All we need to do to get the change is copy paste this command and run it in our Gerrit checkout.

$ git fetch http://gerrithost:8080/p/RecipeBook refs/changes/68/68/2
From http://gerrithost:8080/p/RecipeBook
 * branch            refs/changes/68/68/2 -> FETCH_HEAD
$ git checkout FETCH_HEAD
Note: checking out 'FETCH_HEAD'.

You are in 'detached HEAD' state. You can look around, make experimental
changes and commit them, and you can discard any commits you make in this
state without impacting any branches by performing another checkout.

If you want to create a new branch to retain commits you create, you may
do so (now or later) by using -b with the checkout command again. Example:

  git checkout -b new_branch_name

HEAD is now at d5dacdb... Change to a proper, yeast based pizza dough.

Easy as that, we now have the change in our working copy to play with. You might be interested in what the numbers of the refspec mean.

  • The first 68 is the id of the change mod 100. The only reason for this initial number is to reduce the number of files in any given directory within the git repository.
  • The second 68 is the full id of the change. You’ll notice this in the URL of the Gerrit review screen.
  • The 2 is the patch-set within the change. In this example we uploaded some fixes so we want the second patch set rather than the initial one which the reviewer rejected.

Manually Verifying the Change

For simplicity we’re just going to manually verify the change. The Verifier may be the same person as the code reviewer or a different person entirely. It really depends on the size of the project and what works. If you have Verify permission then when you click the Reviewbutton in the Gerrit web interface you’ll be presented with a verify score.

Verifying the Change
Figure 8. Verifying the Change

Unlike the code review the verify check doesn’t have a +2 or -2 level, it’s either a pass or fail so all we need for the change to be submitted is a +1 score (and no -1’s).

Submitting the Change

You might have noticed that in the verify screen shot there are two buttons for submitting the score Publish Comments and Publish and Submit. The publish and submit button is always visible, but will only work if the change meets the criteria for being submitted (I.e. has been both verified and code reviewed). So it’s a convenience to be able to post review scores as well as submitting the change by clicking a single button. If you choose just to publish comments at this point then the score will be stored but the change won’t yet be accepted into the code base. In this case there will be a Submit Patch Set X button on the main screen. Just as Code-Review and Verify are different operations that can be done by different users, Submission is a third operation that can be limited down to another group of users.

Clicking the Publish and Submit or Submit Patch Set X button will merge the change into the main part of the repository so that it becomes an accepted part of the project. After this anyone fetching the git repository will receive this change as a part of the master branch.


Python debugging with PyDev and eclipse neon

Today we are gonna go through how to install PyDev on eclipse neon.

The best part of it is, it supports debugging in Python very similar to C programs where you start form main() method.

[1] Install Eclipse neon

You can download eclipse as package by clicking here, then you just need to extract it at your desired location and launch eclipse by clicking the eclipse.exe in your extracted folder.

The alternate way is to go to eclipse.org and download eclipse according to your hardware flavor i.e. 32 or 64 bit, you have options to download it as package or installer.

[2] Install PyDev on eclipse

PyDev brings support for working with Python files to Eclipse. Installing the PyDev plugin for Eclipse is very easy:

Go to Help -> Install New Software. Click on Add and add http://pydev.org/updates if you want the Stable version or http://pydev.org/nightly if you want the bleeding edge versions.
PyDev appears in the list below, choose it and follow through the dialog, giving it install permissions and it will be installed. You will need to restart Eclipse to use PyDev.
After installing PyDev, the first thing you wanna do is to enable PyDev debug feature which will help in debugging python scripts.
Add Pydev Start/Stop debug server buttons

In the menu bar select Window -> Customize perspective…, a window Customize Perspective – PyDev will open
Select Command Groups Availability Tab
Check Pydev Debug box and OK
You should see 2 new buttons in your toolbar:
EclipsePydevDebugSrvButtons.png

And there you go you are now able to debug python scripts in eclipse

Tried with: Eclipse Luna 4.4.1 and Ubuntu 14.04 and Windows 10

PS: post below your comments, if you like this post or face any errors

CheersToday we are gonna go through how to install PyDev on eclipse neon.

The best part of it is, it supports debugging in Python very similar to C programs where you start form main() method.

[1] Install Eclipse neon

You can download eclipse as package by clicking here, then you just need to extract it at your desired location and launch eclipse by clicking the eclipse.exe in your extracted folder.

The alternate way is to go to eclipse.org and download eclipse according to your hardware flavor i.e. 32 or 64 bit, you have options to download it as package or installer.

[2] Install PyDev on eclipse

PyDev brings support for working with Python files to Eclipse. Installing the PyDev plugin for Eclipse is very easy:

Go to Help -> Install New Software. Click on Add and add http://pydev.org/updates if you want the Stable version or http://pydev.org/nightly if you want the bleeding edge versions.
PyDev appears in the list below, choose it and follow through the dialog, giving it install permissions and it will be installed. You will need to restart Eclipse to use PyDev.
After installing PyDev, the first thing you wanna do is to enable PyDev debug feature which will help in debugging python scripts.
Add Pydev Start/Stop debug server buttons

In the menu bar select Window -> Customize perspective…, a window Customize Perspective – PyDev will open
Select Command Groups Availability Tab
Check Pydev Debug box and OK
You should see 2 new buttons in your toolbar:
EclipsePydevDebugSrvButtons.png

And there you go you are now able to debug python scripts in eclipse

Tried with: Eclipse Luna 4.4.1 and Ubuntu 14.04 and Windows 10

PS: post below your comments, if you like this post or face any errors

Cheers