pickle and cPickle – Python object serialization

The pickle module implements an algorithm for turning an arbitrary Python object into a series of bytes. This process is also called serializing” the object. The byte stream representing the object can then be transmitted or stored, and later reconstructed to create a new object with the same characteristics.

The cPickle module implements the same algorithm, in C instead of Python. It is many times faster than the Python implementation, but does not allow the user to subclass from Pickle. If subclassing is not important for your use, you probably want to use cPickle.

Warning

The documentation for pickle makes clear that it offers no security guarantees. Be careful if you use pickle for inter-process communication or data storage. Do not trust data you cannot verify as secure.

Importing

It is common to first try to import cPickle, giving an alias of “pickle”. If that import fails for any reason, you can then fall back on the native Python implementation in the pickle module. This gives you the faster implementation, if it is available, and the portable implementation otherwise.

try:
   import cPickle as pickle
except:
   import pickle

Encoding and Decoding Data in Strings

This first example encodes a data structure as a string, then prints the string to the console. It uses a data structure made up of entirely native types. Instances of any class can be pickled, as will be illustrated in a later example. Use pickle.dumps() to create a string representation of the value of the object.

try:
    import cPickle as pickle
except:
    import pickle
import pprint

data = [ { 'a':'A', 'b':2, 'c':3.0 } ]
print 'DATA:',
pprint.pprint(data)

data_string = pickle.dumps(data)
print 'PICKLE:', data_string

By default, the pickle will contain only ASCII characters. A more efficient binary format is also available, but all of the examples here use the ASCII output because it is easier to understand in print.

$ python pickle_string.py

DATA:[{'a': 'A', 'b': 2, 'c': 3.0}]
PICKLE: (lp1
(dp2
S'a'
S'A'
sS'c'
F3
sS'b'
I2
sa.

Once the data is serialized, you can write it to a file, socket, pipe, etc. Then later you can read the file and unpickle the data to construct a new object with the same values.

try:
    import cPickle as pickle
except:
    import pickle
import pprint

data1 = [ { 'a':'A', 'b':2, 'c':3.0 } ]
print 'BEFORE:',
pprint.pprint(data1)

data1_string = pickle.dumps(data1)

data2 = pickle.loads(data1_string)
print 'AFTER:',
pprint.pprint(data2)

print 'SAME?:', (data1 is data2)
print 'EQUAL?:', (data1 == data2)

As you see, the newly constructed object is the equal to but not the same object as the original. No surprise there.

$ python pickle_unpickle.py

BEFORE:[{'a': 'A', 'b': 2, 'c': 3.0}]
AFTER:[{'a': 'A', 'b': 2, 'c': 3.0}]
SAME?: False
EQUAL?: True

Working with Streams

In addition to dumps() and loads(), pickle provides a couple of convenience functions for working with file-like streams. It is possible to write multiple objects to a stream, and then read them from the stream without knowing in advance how many objects are written or how big they are.

try:
    import cPickle as pickle
except:
    import pickle
import pprint
from StringIO import StringIO

class SimpleObject(object):

    def __init__(self, name):
        self.name = name
        l = list(name)
        l.reverse()
        self.name_backwards = ''.join(l)
        return

data = []
data.append(SimpleObject('pickle'))
data.append(SimpleObject('cPickle'))
data.append(SimpleObject('last'))

# Simulate a file with StringIO
out_s = StringIO()

# Write to the stream
for o in data:
    print 'WRITING: %s (%s)' % (o.name, o.name_backwards)
    pickle.dump(o, out_s)
    out_s.flush()

# Set up a read-able stream
in_s = StringIO(out_s.getvalue())

# Read the data
while True:
    try:
        o = pickle.load(in_s)
    except EOFError:
        break
    else:
        print 'READ: %s (%s)' % (o.name, o.name_backwards)

The example simulates streams using StringIO buffers, so we have to play a little trickery to establish the readable stream. A simple database format could use pickles to store objects, too, though shelve would be easier to work with.

$ python pickle_stream.py

WRITING: pickle (elkcip)
WRITING: cPickle (elkciPc)
WRITING: last (tsal)
READ: pickle (elkcip)
READ: cPickle (elkciPc)
READ: last (tsal)

Besides storing data, pickles are very handy for inter-process communication. For example, using os.fork() and os.pipe(), one can establish worker processes that read job instructions from one pipe and write the results to another pipe. The core code for managing the worker pool and sending jobs in and receiving responses can be reused, since the job and response objects don’t have to be of a particular class. If you are using pipes or sockets, do not forget to flush after dumping each object, to push the data through the connection to the other end. See multiprocessing if you don’t want to write your own worker pool manager.

Problems Reconstructing Objects

When working with your own classes, you must ensure that the class being pickled appears in the namespace of the process reading the pickle. Only the data for the instance is pickled, not the class definition. The class name is used to find the constructor to create the new object when unpickling. Take this example, which writes instances of a class to a file:

try:
    import cPickle as pickle
except:
    import pickle
import sys

class SimpleObject(object):

    def __init__(self, name):
        self.name = name
        l = list(name)
        l.reverse()
        self.name_backwards = ''.join(l)
        return

if __name__ == '__main__':
    data = []
    data.append(SimpleObject('pickle'))
    data.append(SimpleObject('cPickle'))
    data.append(SimpleObject('last'))

    try:
        filename = sys.argv[1]
    except IndexError:
        raise RuntimeError('Please specify a filename as an argument to %s' % sys.argv[0])

    out_s = open(filename, 'wb')
    try:
        # Write to the stream
        for o in data:
            print 'WRITING: %s (%s)' % (o.name, o.name_backwards)
            pickle.dump(o, out_s)
    finally:
        out_s.close()

When run, the script creates a file based on the name given as argument on the command line:

$ python pickle_dump_to_file_1.py test.dat

WRITING: pickle (elkcip)
WRITING: cPickle (elkciPc)
WRITING: last (tsal)

A simplistic attempt to load the resulting pickled objects fails:

try:
    import cPickle as pickle
except:
    import pickle
import pprint
from StringIO import StringIO
import sys


try:
    filename = sys.argv[1]
except IndexError:
    raise RuntimeError('Please specify a filename as an argument to %s' % sys.argv[0])

in_s = open(filename, 'rb')
try:
    # Read the data
    while True:
        try:
            o = pickle.load(in_s)
        except EOFError:
            break
        else:
            print 'READ: %s (%s)' % (o.name, o.name_backwards)
finally:
    in_s.close()

This version fails because there is no SimpleObject class available:

$ python pickle_load_from_file_1.py test.dat

Traceback (most recent call last):
  File "pickle_load_from_file_1.py", line 52, in <module>
    o = pickle.load(in_s)
AttributeError: 'module' object has no attribute 'SimpleObject'

The corrected version, which imports SimpleObject from the original script, succeeds.

Add:

from pickle_dump_to_file_1 import SimpleObject

to the end of the import list, then re-run the script:

$ python pickle_load_from_file_2.py test.dat

READ: pickle (elkcip)
READ: cPickle (elkciPc)
READ: last (tsal)

There are some special considerations when pickling data types with values that cannot be pickled (sockets, file handles, database connections, etc.). Classes that use values which cannot be pickled can define __getstate__() and __setstate__() to return a subset of the state of the instance to be pickled. New-style classes can also define __getnewargs__(), which should return arguments to be passed to the class memory allocator (C.__new__()). Use of these features is covered in more detail in the standard library documentation.

Circular References

The pickle protocol automatically handles circular references between objects, so you don’t need to do anything special with complex data structures. Consider the digraph:

digraph pickle_example { "root"; "root" -> "a"; "root" -> "b"; "a" -> "b"; "b" -> "a"; "b" -> "c"; "a" -> "a"; }

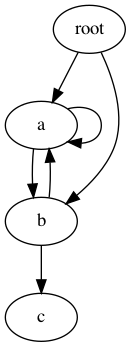
Even though the graph includes several cycles, the correct structure can be pickled and then reloaded.

import pickle

class Node(object):
    """A simple digraph where each node knows about the other nodes
    it leads to.
    """
    def __init__(self, name):
        self.name = name
        self.connections = []
        return

    def add_edge(self, node):
        "Create an edge between this node and the other."
        self.connections.append(node)
        return

    def __iter__(self):
        return iter(self.connections)

def preorder_traversal(root, seen=None, parent=None):
    """Generator function to yield the edges via a preorder traversal."""
    if seen is None:
        seen = set()
    yield (parent, root)
    if root in seen:
        return
    seen.add(root)
    for node in root:
        for (parent, subnode) in preorder_traversal(node, seen, root):
            yield (parent, subnode)
    return
    
def show_edges(root):
    "Print all of the edges in the graph."
    for parent, child in preorder_traversal(root):
        if not parent:
            continue
        print '%5s -> %2s (%s)' % (parent.name, child.name, id(child))

# Set up the nodes.
root = Node('root')
a = Node('a')
b = Node('b')
c = Node('c')

# Add edges between them.
root.add_edge(a)
root.add_edge(b)
a.add_edge(b)
b.add_edge(a)
b.add_edge(c)
a.add_edge(a)

print 'ORIGINAL GRAPH:'
show_edges(root)

# Pickle and unpickle the graph to create
# a new set of nodes.
dumped = pickle.dumps(root)
reloaded = pickle.loads(dumped)

print
print 'RELOADED GRAPH:'
show_edges(reloaded)

The reloaded nodes are not the same object, but the relationship between the nodes is maintained and only one copy of the object with multiple reference is reloaded. Both of these statements can be verified by examining the id() values for the nodes before and after being passed through pickle.

$ python pickle_cycle.py

ORIGINAL GRAPH:
 root ->  a (4299721744)
    a ->  b (4299721808)
    b ->  a (4299721744)
    b ->  c (4299721872)
    a ->  a (4299721744)
 root ->  b (4299721808)

RELOADED GRAPH:
 root ->  a (4299722000)
    a ->  b (4299722064)
    b ->  a (4299722000)
    b ->  c (4299722128)
    a ->  a (4299722000)
 root ->  b (4299722064)

Lambda, filter, reduce and map

Lambda Operator

Ring als Symbol der for-Schleife

Some like it, others hate it and many are afraid of the lambda operator. We are confident that you will like it, when you have finished with this chapter of our tutorial. If not, you can learn all about “List Comprehensions”, Guido van Rossums preferred way to do it, because he doesn’t like Lambda, map, filter and reduce either.

The lambda operator or lambda function is a way to create small anonymous functions, i.e. functions without a name. These functions are throw-away functions, i.e. they are just needed where they have been created. Lambda functions are mainly used in combination with the functions filter(), map() and reduce(). The lambda feature was added to Python due to the demand from Lisp programmers.

The general syntax of a lambda function is quite simple:
lambda argument_list: expression
The argument list consists of a comma separated list of arguments and the expression is an arithmetic expression using these arguments. You can assign the function to a variable to give it a name.
The following example of a lambda function returns the sum of its two arguments:

>>> f = lambda x, y : x + y
>>> f(1,1)
2

The map() Function

The advantage of the lambda operator can be seen when it is used in combination with the map() function.
map() is a function with two arguments:

r = map(func, seq)

The first argument func is the name of a function and the second a sequence (e.g. a list) seqmap() applies the function func to all the elements of the sequence seq. It returns a new list with the elements changed by func

def fahrenheit(T):
    return ((float(9)/5)*T + 32)
def celsius(T):
    return (float(5)/9)*(T-32)
temp = (36.5, 37, 37.5,39)

F = map(fahrenheit, temp)
C = map(celsius, F)

In the example above we haven’t used lambda. By using lambda, we wouldn’t have had to define and name the functions fahrenheit() and celsius(). You can see this in the following interactive session:

>>> Celsius = [39.2, 36.5, 37.3, 37.8]
>>> Fahrenheit = map(lambda x: (float(9)/5)*x + 32, Celsius)
>>> print Fahrenheit
[102.56, 97.700000000000003, 99.140000000000001, 100.03999999999999]
>>> C = map(lambda x: (float(5)/9)*(x-32), Fahrenheit)
>>> print C
[39.200000000000003, 36.5, 37.300000000000004, 37.799999999999997]
>>> 

map() can be applied to more than one list. The lists have to have the same length. map() will apply its lambda function to the elements of the argument lists, i.e. it first applies to the elements with the 0th index, then to the elements with the 1st index until the n-th index is reached:

>>> a = [1,2,3,4]
>>> b = [17,12,11,10]
>>> c = [-1,-4,5,9]
>>> map(lambda x,y:x+y, a,b)
[18, 14, 14, 14]
>>> map(lambda x,y,z:x+y+z, a,b,c)
[17, 10, 19, 23]
>>> map(lambda x,y,z:x+y-z, a,b,c)
[19, 18, 9, 5]

We can see in the example above that the parameter x gets its values from the list a, while y gets its values from b and z from list c.

Filtering

The function filter(function, list) offers an elegant way to filter out all the elements of a list, for which the function function returns True.
The function filter(f,l) needs a function f as its first argument. f returns a Boolean value, i.e. either True or False. This function will be applied to every element of the list l. Only if f returns True will the element of the list be included in the result list.

>>> fib = [0,1,1,2,3,5,8,13,21,34,55]
>>> result = filter(lambda x: x % 2, fib)
>>> print result
[1, 1, 3, 5, 13, 21, 55]
>>> result = filter(lambda x: x % 2 == 0, fib)
>>> print result
[0, 2, 8, 34]
>>> 

Reducing a List

The function reduce(func, seq) continually applies the function func() to the sequence seq. It returns a single value.

If seq = [ s1, s2, s3, … , sn ], calling reduce(func, seq) works like this:

  • At first the first two elements of seq will be applied to func, i.e. func(s1,s2) The list on which reduce() works looks now like this: [ func(s1, s2), s3, … , sn ]
  • In the next step func will be applied on the previous result and the third element of the list, i.e. func(func(s1, s2),s3)
    The list looks like this now: [ func(func(s1, s2),s3), … , sn ]
  • Continue like this until just one element is left and return this element as the result of reduce()

We illustrate this process in the following example:

>>> reduce(lambda x,y: x+y, [47,11,42,13])
113

The following diagram shows the intermediate steps of the calculation:
Veranschulichung von Reduce

Examples of reduce()

Determining the maximum of a list of numerical values by using reduce:

>>> f = lambda a,b: a if (a > b) else b
>>> reduce(f, [47,11,42,102,13])
102
>>> 

Calculating the sum of the numbers from 1 to 100:

>>> reduce(lambda x, y: x+y, range(1,101))
5050

What is the { get; set; } syntax in C#?

So as I understand it {get; set;} is an “auto property” which just like @Klaus and @Brandon said is shorthand for writing a property with a “backing field.” So in this case:

public class Genre
{
    private string name; // This is the backing field
    public string Name // This is your property
    {
        get {return name;}
        set {name = value;}
    }
}

However if you’re like me – about an hour or so ago – you don’t really understand what properties and accessors are, and you don’t have the best understanding of some basic terminologies either. MSDN is a great tool for learning stuff like this but it’s not always easy to understand for beginners. So I’m gonna try to explain this more in-depth here.

get and set are accessors, meaning they’re able to access data and info in private fields (usually from a backing field) and usually do so from public properties (as you can see in the above example).

There’s no denying that the above statement is pretty confusing, so let’s go into some examples. Let’s say this code is referring to genres of music. So within the class Genre, we’re going to want different genres of music. Let’s say we want to have 3 genres: Hip Hop, Rock, and Country. To do this we would use the name of the Class to create new instances of that class.

Genre g1 = new Genre(); //Here we're creating a new instance of the class "Genre"
                        //called g1. We'll create as many as we need (3)
Genre g2 = new Genre();
Genre g3 = new Genre();

//Note the () following new Genre. I believe that's essential since we're creating a
//new instance of a class (Like I said, I'm a beginner so I can't tell you exactly why
//it's there but I do know it's essential)

Now that we’ve created the instances of the Genre class we can set the genre names using the ‘Name’ property that was set way up above.

public string Name //Again, this is the 'Name' property
{ get; set; } //And this is the shorthand version the process we're doing right now 

We can set the name of ‘g1’ to Hip Hop by writing the following

g1.Name = "Hip Hop";

What’s happening here is sort of complex. Like I said before, get and set access information from private fields that you otherwise wouldn’t be able to access. get can only read information from that private field and return it. set can only write information in that private field. But by having a property with both get and set we’re able do both of those functions. And by writing g1.Name = "Hip Hop"; we are specifically using the set function from our Name property

set uses an implicit variable called value. Basically what this means is any time you see “value” within set, it’s referring to a variable; the “value” variable. When we write g1.Name = we’re using the = to pass in the value variable which in this case is "Hip Hop". So you can essentially think of it like this:

public class g1 //We've created an instance of the Genre Class called "g1"
{
    private string name;
    public string Name
    {
        get{return name;}
        set{name = "Hip Hop"} //instead of 'value', "Hip Hop" is written because 
                              //'value' in 'g1' was set to "Hip Hop" by previously
                              //writing 'g1.Name = "Hip Hop"'
    }
}

It’s Important to note that the above example isn’t actually written in the code. It’s more of a hypothetical code that represents what’s going on in the background.

So now that we’ve set the Name of the g1 instance of Genre, I believe we can get the name by writing

console.WriteLine (g1.Name); //This uses the 'get' function from our 'Name' Property 
                             //and returns the field 'name' which we just set to
                             //"Hip Hop"

and if we ran this we would get "Hip Hop" in our console.

So for the purpose of this explanation I’ll complete the example with outputs as well

using System;
public class Genre
{
    public string Name { get; set; }
}

public class MainClass
{
    public static void Main()
    {
        Genre g1 = new Genre();
        Genre g2 = new Genre();
        Genre g3 = new Genre();

        g1.Name = "Hip Hop";
        g2.Name = "Rock";
        g3.Name = "Country";

        Console.WriteLine ("Genres: {0}, {1}, {2}", g1.Name, g2.Name, g3.Name);
    }
}

Output:

"Genres: Hip Hop, Rock, Country"
 

Creating namedtuple classes with optional or default arguments

The Issue

Say you want to create a simple class for rectangles using named tuples:

Rectangle = namedtuple("Rectangle", "length width color")

The issue is that you don’t know the color of some of your rectangles, so you whish to set it to None or white per default. Unfortunately namedtuples do not allow that, if you try,

Rectangle(5,10)

You’ll get the error:

TypeError: new() takes exactly 3 arguments (2 given)

The Solution:

Create a subclass out of the namedtuple and override its new method to allow optional parameters:

class Rectangle(namedtuple('Rectangle', [ "length", "width", "color"])):
    def __new__(cls, length, width, color="white"):
        return super(TemplateContainer, cls).__new__(cls, length, width, color)

Now we can run

r = Rectangle(5, 10)
print r.color
>> "White"

Natural Sorting in Python

If you have a list of strings containing numbers and you wanna sort in it the human sorting or natural sorting then you might like this post

For example I get something like this:

something1
something12
something17
something2
something25
something29

with the sort() method.

I know that you probably need to extract the numbers somehow and then sort the list but you have no idea how to do it in the most simple way.

The following is what you are looking for

import re

def atoi(text):
    return int(text) if text.isdigit() else text

def natural_keys(text):
    '''
    alist.sort(key=natural_keys) sorts in human order
    http://nedbatchelder.com/blog/200712/human_sorting.html
    (See Toothy's implementation in the comments)
    '''
    return [ atoi(c) for c in re.split('(\d+)', text) ]

alist=[
    "something1",
    "something12",
    "something17",
    "something2",
    "something25",
    "something29"]

alist.sort(key=natural_keys)
print(alist)

yields

['something1', 'something2', 'something12', 'something17', 'something25', 'something29']


default dict in python/ dict of list in python

You can build it with list comprehension like this:

>>> dict((i, range(int(i), int(i) + 2)) for i in ['1', '2'])
{'1': [1, 2], '2': [2, 3]}

And for the second part of your question use defaultdict

>>> from collections import defaultdict
>>> s = [('yellow', 1), ('blue', 2), ('yellow', 3), ('blue', 4), ('red', 1)]
>>> d = defaultdict(list)
>>> for k, v in s:
        d[k].append(v)

>>> d.items()
[('blue', [2, 4]), ('red', [1]), ('yellow', [1, 3])]

The Python “with” Statement by Example

Python’s with statement was first introduced five years ago, in Python 2.5. It’s handy when you have two related operations which you’d like to execute as a pair, with a block of code in between. The classic example is opening a file, manipulating the file, then closing it:

with open('output.txt', 'w') as f:
    f.write('Hi there!')

The above with statement will automatically close the file after the nested block of code. (Continue reading to see exactly how the close occurs.) The advantage of using a with statement is that it is guaranteed to close the file no matter how the nested block exits. If an exception occurs before the end of the block, it will close the file before the exception is caught by an outer exception handler. If the nested block were to contain a return statement, or a continue or break statement, the with statement would automatically close the file in those cases, too.

Here’s another example. The pycairo drawing library contains a Context class which exposes a save method, to push the current drawing state on an internal stack, and a restore method, to restore the drawing state from the stack. These two functions are always called in a pair, with some code in between.

This code sample uses a Context object (“cairo context”) to draw six rectangles, each with a different rotation. Each call to rotate is actually combined with the current transformation, so we use a pair of calls to save and restore to preserve the drawing state on each iteration of the loop. This prevents the rotations from combining with each other:

cr.translate(68, 68)
for i in xrange(6):
    cr.save()
    cr.rotate(2 * math.pi * i / 6)
    cr.rectangle(-25, -60, 50, 40)
    cr.stroke()
    cr.restore()

That’s a fairly simple example, but for larger scripts, it can become cumbersome to keep track of which save goes with which restore, and to keep them correctly matched. The with statement can help tidy things up a bit.

By themselves, pycairo’s save and restore methods do not support the with statement, so we’ll have to add the support on our own. There are two ways to support the with statement: by implementing a context manager class, or by writing a generator function. I’ll demonstrate both approaches.

Implementing the Context Manager as a Class

Here’s the first approach. To implement a context manager, we define a class containing an __enter__ and __exit__ method. The class below accepts a cairo context, cr, in its constructor:

class Saved():
    def __init__(self, cr):
        self.cr = cr
    def __enter__(self):
        self.cr.save()
        return self.cr
    def __exit__(self, type, value, traceback):
        self.cr.restore()

Thanks to those two methods, it’s valid to instantiate a Saved object and use it in a with statement. The Saved object is considered to be the context manager.

cr.translate(68, 68)
for i in xrange(6):
    with Saved(cr):
        cr.rotate(2 * math.pi * i / 6)
        cr.rectangle(-25, -60, 50, 40)
        cr.stroke()

Here are the exact steps taken by the Python interpreter when it reaches the with statement:

  1. The with statement stores the Saved object in a temporary, hidden variable, since it’ll be needed later. (Actually, it only stores the bound __exit__ method, but that’s a detail.)
  2. The with statement calls __enter__ on the Saved object, giving the context manager a chance to do its job.
  3. The __enter__ method calls save on the cairo context.
  4. The __enter__ method returns the cairo context, but as you can see, we have not specified the optional "as" target part of the with statement. Therefore, the return value is not saved anywhere. We don’t need it; we know it’s the same cairo context that we passed in.
  5. The nested block of code is executed. It sets up the rotation and draws a rectangle.
  6. At the end of the nested block, the with statement calls the Saved object’s __exit__ method, passing the arguments (None, None, None) to indicate that no exception occured.
  7. The __exit__ method calls restore on the cairo context.

Once we understand what the Python interpreter is doing, we can make better sense of the example at the beginning of this blog post, where we opened a file in the with statement: File objects expose their own __enter__ and __exit__ methods, and can therefore act as their own context managers. Specifically, the __exit__ method closes the file.

Exception Handling

Returning to the drawing example, what happens if an exception occurs within the nested code block? For example, suppose we mistakenly passed the wrong number of arguments to the rectangle call. In that case, the steps taken by the Python interpreter would be:

  1. The rectangle method raises a TypeError exception: “Context.rectangle() takes exactly 4 arguments.”
  2. The with statement catches this exception.
  3. The with statement calls __exit__ on the Saved object. It passes information about the exception in three arguments: (type, value, traceback) – the same values you’d get by calling sys.exc_info. This tells the __exit__ method everything it could possibly need to know about the exception that occurred.
  4. In this case, our __exit__ method doesn’t particularly care. It calls restore on the cairo context anyway, and returns None. (In Python, when no return statement is specified, the function actually returns None.)
  5. The with statement checks to see whether this return value is true. Since it isn’t, the with statement re-raises the TypeError exception to be handled by someone else.

In this manner, we can guarantee that restore will always be called on the cairo context, whether an exception occurs or not.

Implementing the Context Manager as a Generator

That brings us to the second approach for supporting the with statement. Instead of implementing a class for the context manager, we can write a generator function. Here’s a simplified example of such a generator function. Let me point out right away that this example is incomplete, since it does not handle exceptions very well. Read on for more details:

from contextlib import contextmanager

@contextmanager
def saved(cr):
    cr.save()
    yield cr
    cr.restore()

There is a certain charm to writing a generator like this one. At first glance, it appears simpler than the previous approach: A single function takes the place of an entire class definition. But don’t be fooled! This approach involves many more steps, and a lot more complexity than the previous approach. It took me several reads of PEP 343 – which is more of a historical document than a reference – before I could claim to understand it completely. It requires familiarity with Python decorators, generators, iterators and functions-returning-functions, in addition to the object-oriented programming and exception handling we’ve already seen.

To make this generator work, two entities from contextlib, a standard Python module, are required: the contextmanager function, and an internal class named GeneratorContextManager. The source code, contextlib.py, is a bit hairy, but at least it’s short. I’ll simply describe what happens, and you are free to refer to the source code, and any other supplementary materials, as needed.

Let’s start with the generator itself. Here’s what happens when the above code snippet runs:

  1. The Python interpreter recognizes the yield statement in the middle of the function definition. As a result, the def statement does not create a normal function; it creates a generator function.
  2. Because of the presence of the @contextmanager decorator, contextmanager is called with the generator function as its argument.
  3. The contextmanager function returns a “factory” function, which creates GeneratorContextManager objects wrapped around the provided generator. (line 83 of contextlib.py)
  4. Finally, the factory function is assigned to saved. From this point on, when we call saved, we’ll actually be calling the factory function.

Equipped with all that good stuff, we can now write:

for i in xrange(6):
    with saved(cr):
        cr.rotate(2 * math.pi * i / 6)
        cr.rectangle(-25, -60, 50, 40)
        cr.stroke()

Here are all the steps taken by the Python interpreter when it reaches the with statement.

  1. The with statement calls saved, which of course, calls the factory function, passing cr, a cairo context, as its only argument.
  2. The factory function passes the cairo context to our generator function, creating a generator.
  3. The generator is passed to the constructor of GeneratorContextManager, an internal class which will act as our context manager.
  4. The with statement saves the GeneratorContextManager object in a temporary hidden variable. (Actually, it only stores the bound __exit__ method, but that’s a detail.)
  5. The with statement calls __enter__ on the GeneratorContextManager object.
  6. __enter__ calls next on the generator.
  7. Our generator function – the block of code we defined under def saved(cr) – runs up until the yield statement. This calls save on the cairo context.
  8. The yield statement yields the cairo context, which becomes the return value for the call to next on the iterator.
  9. The __enter__ method returns the cairo context, but as you can see, we have not specified the optional "as" target part of the with statement. Therefore, the return value is not saved anywhere. We don’t need it; we know it’s the same cairo context that we passed in.
  10. The nested code block is executed. It sets up the rotation and draws a rectangle.
  11. At the end of the nested block, the with statement calls the __exit__ method on the GeneratorContextManager object, passing the arguments (None, None, None) to indicate that no exception occured.
  12. The __exit__ method calls next on the iterator (expecting a StopIteration exception).
  13. Our generator resumes execution after the yield statement. This calls restore on the cairo context.
  14. The generator returns, raising a StopIteration exception (as expected).
  15. The __exit__ method catches the StopIteration exception, and returns normally.

And that’s it! We’ve successfully used this generator function as a with statement context manager. In this example, it helped that no exceptions occured. To correctly deal with exceptions, we’ll have to improve the generator function a little bit.

Exception Handling

Now, what happens if an exception occurs within the nested block while using this approach? Again, let’s suppose we’ve mistakenly passed the wrong number of arguments to the rectangle call. Here’s what would happen:

  1. The rectangle method raises a TypeError exception: “Context.rectangle() takes exactly 4 arguments.”
  2. The with statement catches this exception.
  3. The with statement calls __exit__ on the GeneratorContextManager object. It passes information about the exception in three arguments: (type, value, traceback).
  4. __exit__ calls throw on the iterator, passing the same three arguments.
  5. The TypeError exception is raised in the context of our generator function, on the line containing the yield statement.

Uh oh! At this point, our current generator function has a problem: restore will not be called on the cairo context. An exception has been raised on the line containing the yield statement, so the rest of the generator function will not be executed. We need to make the generator more robust, by inserting a try/finally block around the yield:

@contextmanager
def saved(cr):
    cr.save()
    try:
        yield cr
    finally:
        cr.restore()

Continuing where we left off:

  1. Inside our generator, the finally block executes. This calls restore on the cairo context.
  2. The TypeError exception went unhandled by the generator, so it is re-raised in the __exit__ method, on the line containing the call to throw on the iterator. (line 35 of contextlib.py)
  3. The TypeError exception is caught by __exit__.
  4. __exit__ sees that the exception caught is the same exception that was passed in, and as a result, returns None.
  5. The with statement checks to see whether this return value is true. Since it isn’t, the with statement re-raises the TypeError exception, to be handled by someone else.

Thus concludes our journey through the Python with statement. If, like me, you’ve had a hard time understanding this statement completely – especially if you were attracted to the generator form of writing context managers – don’t feel bad. It’s complicated! It cleverly ties together several of Python’s language features, many of which were themselves introduced fairly recently in Python’s history. If any Pythonistas out there spot an error or oversight in the above explanation, please let me know in the comments.

Drawing a Fractal Tree

For those of you who have endured the entire blog post up to this point, here’s a small bonus script. It uses our newly minted cairo context manager to recursively draw a fractal tree.

import cairo
from contextlib import contextmanager

@contextmanager
def saved(cr):
    cr.save()
    try:
        yield cr
    finally:
        cr.restore()

def Tree(angle):
    cr.move_to(0, 0)
    cr.translate(0, -65)
    cr.line_to(0, 0)
    cr.stroke()
    cr.scale(0.72, 0.72)
    if angle > 0.12:
        for a in [-angle, angle]:
            with saved(cr):
                cr.rotate(a)
                Tree(angle * 0.75)

surf = cairo.ImageSurface(cairo.FORMAT_ARGB32, 280, 204)
cr = cairo.Context(surf)
cr.translate(140, 203)
cr.set_line_width(5)
Tree(0.75)
surf.write_to_png('fractal-tree.png')

For yet another example of with statement usage in Python, see Timing Your Code Using Python’s “with” Statement

Windows .executable from Python developing in Ubuntu

Puhh…that is a tricky one! After fiddling a lot it…it seems now so easy…

So I think I have to share that with…everybody who ever is also faced with that strange task 😉

OK…I think you already know that it is not simply possible to make an executable file for a Windows system…with the well know extension: *.exe

But we will make that magic happen 😉 … in fact it is not magic its just a combination of the following tools/versions:

Quick overview:

We will make an executable file from our python-project using pyinstaller. We do that in a simulated windows-environment using wine. This, lets call it, ‘simulated windows’ gets an installation of python and pywin32. As it is always a good idea to work clean…we do that in a virtual environment, so our major wine-installation wond’t get touched…isn’t that cool 🙂 Let’s do it:

Make a test project

Actually, we could make a very simple example like:


mkdir ~/pyToExe
cd ~/pyToExe
nano test.py

test.py

print "Hello, this is a test!"

But I a very good tutorial gave some more complex code that worked directly, so we’ll use that:

test.py

import Tkinter
from Tkinter import *
root = Tk()
root.title('A Tk Application')
Label(text='I am a label').pack(pady=15)
root.mainloop()
print "Successfully, saved processed!'"


Install ‘pyinstaller’

As we can read in the same tutorial, but also here, we can simply make a single execeutable file doing that:

git clone https://github.com/pyinstaller/pyinstaller
python pyinstaller/pyinstaller.py test.py

Check it out…you can already execute it!

./dist/test

Setup a simple ‘virtual windows’

But try that on windows…you will fail! As this is made with Linux it is not executable on windows! I searched a lot for that ‘cross-compiling’ problem and found finally two very good links:

And found out that the guy, who gave the solutions (BTW: Thank you very much!!!) implemented a solution to start wine in a virtual environment. Let’s initialise it:

git clone https://github.com/htgoebel/virtual-wine.git
apt-get install scons
./virtual-wine/vwine-setup venv_wine

At the end you can choose the type of Windows…I chose Windows7!

Upgrade to a ‘virtual windows-python’

  • we can start the new virtual wine-environment (pretty similar to an normal virtualenv), and
  • install python and pywin32 (which we have dowloaded from the links above and saved in our folder ‘pyToExe’, in the the meantime 🙂

(Helpfull, but I do it differently)

. venv_wine/bin/activate
wine msiexec -i python-2.7.8.msi
wine pywin32-218.win32-py2.7.exe

At this point it is very necessary to use versions that fit exactly to each other!

Make a real .exe*cutable

Now, we have a simple virtual ‘windows-python’ which we can give pyinstall as python-environment:

rm -r build
rm -r dist
rm test.spec
wine c:/Python27/python.exe pyinstaller/pyinstaller.py --onefile test.py
ll dist/

Yeah…there is the needed extension, but see test if it works in windows using wine:

wine dist/test.exe

What did I say simple isn’t it?!? Go on and try it on a windows…my test where successfull 🙂

All still open tabs of my browser in one list, thank you so much!!!

Make following changes to remove warnings :-

  1. Go to C:\Python27\Lib\site-packages\PyInstaller\build.py
  2. Find the def append(self, tpl): function.
  3. Change if tpl[2] == "BINARY": to if tpl[2] in ["BINARY", "DATA"]:

DATA STRUCTURE – PRIORITY QUEUE & HEAPQ

Priority Queue

A priority queue is an abstract data type (ADT) which is like a regular queue or stack data structure, but where additionally each element has a priority associated with it. In a priority queue, an element with high priority is served before an element with low priority. If two elements have the same priority, they are served according to their order in the queue.

While priority queues are often implemented with heaps, they are conceptually distinct from heaps. A priority queue is an abstract concept like a list or a map; just as a list can be implemented with a linked list or an array, a priority queue can be implemented with a heap or a variety of other methods such as an unordered array.

from wiki Priority queue.

Sample A – simplest

The following code the most simplest usage of the priority queue.

try:
    import Queue as Q  # ver. < 3.0
except ImportError:
    import queue as Q

q = Q.PriorityQueue()
q.put(10)
q.put(1)
q.put(5)
while not q.empty():
    print q.get(),

Output:

1 5 10

As we can see from the output, the queue stores the elements by priority not by the order of element creation. Note that depending on the Python versions, the name of the priority queue is different. So, we used try and except pair so that we can adjust our container to the version.

The priority queue not only stores the built-in primitives but also any objects as shown in next section.

Sample B – tuple

The priority queue can store objects such as tuples:

try:
    import Queue as Q  # ver. < 3.0
except ImportError:
    import queue as Q

q = Q.PriorityQueue()
q.put((10,'ten'))
q.put((1,'one'))
q.put((5,'five'))
while not q.empty():
    print q.get(),

Output:

(1, 'one') (5, 'five') (10, 'ten')
Sample C – class objects using __cmp__()

Python isn’t strongly typed, so we can save anything we like: just as we stored a tuple of (priority,thing) in previous section. We can also store class objects if we override __cmp__() method:

try:
    import Queue as Q  # ver. < 3.0
except ImportError:
    import queue as Q

class Skill(object):
    def __init__(self, priority, description):
        self.priority = priority
        self.description = description
        print 'New Level:', description
        return
    def __cmp__(self, other):
        return cmp(self.priority, other.priority)

q = Q.PriorityQueue()

q.put(Skill(5, 'Proficient'))
q.put(Skill(10, 'Expert'))
q.put(Skill(1, 'Novice'))

while not q.empty():
    next_level = q.get()
    print 'Processing level:', next_level.description

Output:

New Level: Proficient
New Level: Expert
New Level: Novice
Processing level: Novice
Processing level: Proficient
Processing level: Expert
heapq – Heap queue

The heapq implements a min-heap sort algorithm suitable for use with Python’s lists.

This module provides an implementation of the heap queue algorithm, also known as the priority queue algorithm.

Heaps are binary trees for which every parent node has a value less than or equal to any of its children. This implementation uses arrays for which $heap\left[k\right] \le heap\left[2*k+1\right]$ and $heap\left[k\right] \le heap\left[2*k+2\right]$ for all $k$, counting elements from zero. For the sake of comparison, non-existing elements are considered to be infinite. The interesting property of a heap is that its smallest element is always the root, $heap\left[0\right]$.

From https://docs.python.org/2/library/heapq.html.

import heapq

heap = []
heapq.heappush(heap, (1, 'one'))
heapq.heappush(heap, (10, 'ten'))
heapq.heappush(heap, (5,'five'))

for x in heap:
    print x,
print

heapq.heappop(heap)

for x in heap:
    print x,
print 

# the smallest
print heap[0]

Output:

(1, 'one') (10, 'ten') (5, 'five')
(5, 'five') (10, 'ten')
(5, 'five')
heapq – heapify

We can Transform list $x$ into a heap, in-place, in linear time:

heapq.heapify(x)

For example,

import heapq

heap = [(1, 'one'), (10, 'ten'), (5,'five')]
heapq.heapify(heap)
for x in heap:
    print x,
print

heap[1] = (9, 'nine')
for x in heap:
    print x,

Output:

(1, 'one') (10, 'ten') (5, 'five')
(1, 'one') (9, 'nine') (5, 'five')

Note that we replaced (10, ‘ten’) with (9, ‘nine’).

How namedtuple works in Python 2.7

The other day, I was on a plane to San Francisco. Lacking an internet connection, I decided to read through some of the source for Python 2.7’s standard library. I found namedtuple’s implementation especially interesting, I guess because I had assumed it was a lot more magical than it turns out to be.

Here’s the source, reprinted with some annotations on stuff I found interesting. If you haven’t heard of namedtuple before, it’s a very useful builtin that you should check out.

The code

################################################################################
### namedtuple
################################################################################

woo! doesn’t that comment header get you jazzed!?

We start off with—you guessed it—a function declaration and a good use of doctests.

def namedtuple(typename, field_names, verbose=False, rename=False):
    """Returns a new subclass of tuple with named fields.

    >>> Point = namedtuple('Point', 'x y')
    >>> Point.__doc__                   # docstring for the new class
    'Point(x, y)'
    >>> p = Point(11, y=22)             # instantiate with positional args or keywords
    >>> p[0] + p[1]                     # indexable like a plain tuple
    33
    >>> x, y = p                        # unpack like a regular tuple
    >>> x, y
    (11, 22)
    >>> p.x + p.y                       # fields also accessable by name
    33
    >>> d = p._asdict()                 # convert to a dictionary
    >>> d['x']
    11
    >>> Point(**d)                      # convert from a dictionary
    Point(x=11, y=22)
    >>> p._replace(x=100)               # _replace() is like str.replace() but targets named fields
    Point(x=100, y=22)

    """

Below we start with some argument wrangling. Note the use of basestring, which should be used for isinstance checks that try to determine if something is str-like1: this way, we capture both unicode and str types.

    # Parse and validate the field names.  Validation serves two purposes,
    # generating informative error messages and preventing template injection attacks.
    if isinstance(field_names, basestring):
        field_names = field_names.replace(',', ' ').split() # names separated by whitespace and/or commas

If rename has been set truthy, we pick out all the invalid names given and underscore ‘em for new (and hopefully valid) names.

    field_names = tuple(map(str, field_names))
    if rename:
        names = list(field_names)
        seen = set()
        for i, name in enumerate(names):
            if (not all(c.isalnum() or c=='_' for c in name) or _iskeyword(name)
                or not name or name[0].isdigit() or name.startswith('_')
                or name in seen):
                names[i] = '_%d' % i
            seen.add(name)
        field_names = tuple(names)

Note the nice use of a generator expression wrapped in all() below. The all(bool_expr(x) for x in things) pattern is a really powerful way of compressing an expectation about many arguments into one readable statement.

    for name in (typename,) + field_names:
        if not all(c.isalnum() or c=='_' for c in name):
            raise ValueError('Type names and field names can only contain alphanumeric characters and underscores: %r' % name)
        if _iskeyword(name):
            raise ValueError('Type names and field names cannot be a keyword: %r' % name)
        if name[0].isdigit():
            raise ValueError('Type names and field names cannot start with a number: %r' % name)

A quick check for duplicate fields:

    seen_names = set()
    for name in field_names:
        if name.startswith('_') and not rename:
            raise ValueError('Field names cannot start with an underscore: %r' % name)
        if name in seen_names:
            raise ValueError('Encountered duplicate field name: %r' % name)
        seen_names.add(name)

Now the fun really starts2. Arrange the field names in various ways in preparation for injection into a code template. Note the cute repurposing of a tuple str representation for argtxt, and the slice notation for duplicating a sequence without its first and last elements.

    # Create and fill-in the class template
    numfields = len(field_names)
    argtxt = repr(field_names).replace("'", "")[1:-1]   # tuple repr without parens or quotes
    reprtxt = ', '.join('%s=%%r' % name for name in field_names)

Here’s namedtuple behind the curtain; a format string that resembles (and will be rendered to) Python code. I’ve added extra linebreaks for clarity.

    template = '''class %(typename)s(tuple):
        '%(typename)s(%(argtxt)s)' \n
        __slots__ = () \n
        _fields = %(field_names)r \n

        def __new__(_cls, %(argtxt)s):
            'Create new instance of %(typename)s(%(argtxt)s)'
            return _tuple.__new__(_cls, (%(argtxt)s)) \n

        @classmethod
        def _make(cls, iterable, new=tuple.__new__, len=len):
            'Make a new %(typename)s object from a sequence or iterable'
            result = new(cls, iterable)
            if len(result) != %(numfields)d:
                raise TypeError('Expected %(numfields)d arguments, got %%d' %% len(result))
            return result \n

        def __repr__(self):
            'Return a nicely formatted representation string'
            return '%(typename)s(%(reprtxt)s)' %% self \n

        def _asdict(self):
            'Return a new OrderedDict which maps field names to their values'
            return OrderedDict(zip(self._fields, self)) \n

        __dict__ = property(_asdict) \n

        def _replace(_self, **kwds):
            'Return a new %(typename)s object replacing specified fields with new values'
            result = _self._make(map(kwds.pop, %(field_names)r, _self))
            if kwds:
                raise ValueError('Got unexpected field names: %%r' %% kwds.keys())
            return result \n

        def __getnewargs__(self):
            'Return self as a plain tuple.  Used by copy and pickle.'
            return tuple(self) \n\n
        
        ''' % locals()

So there it is, our template for a new class.

I like the use of locals() for string interpolation. I’d always missed easy interpolation of local variables in Python; groovy and coffeescript both have ways of saying something like "{name} is {some_value}". I guess "{name} is {some_value}".format(**locals()) is close.

You probably noticed that __slots__ is set to an empty tuple; this ensures that Python doesn’t set aside a dictionary for each instantiation of this new class, making instances lightweight. Between the immutability provided by the parent class (tuple) and the fact that new attributes can’t be slapped onto instances (__slots__ = ()), instances created by namedtuple types are basically value objects.

Next, a read-only property is attached for each field. Note that _itemgetter comes from the operatormodule and returns a callable that takes a single argument, so it fits nicely into property.

    for i, name in enumerate(field_names):
        template += "        %s = _property(_itemgetter(%d), doc='Alias for field number %d')\n" % (name, i, i)
    if verbose:
        print template

So, we’ve got a pretty grandiose str containing Python code; now what do we do with it?

Evaluation in a travel-sized namespace sounds about right. Check out the use of exec ... in.

    # Execute the template string in a temporary namespace and
    # support tracing utilities by setting a value for frame.f_globals['__name__']
    namespace = dict(_itemgetter=_itemgetter, __name__='namedtuple_%s' % typename,
                     OrderedDict=OrderedDict, _property=property, _tuple=tuple)
    try:
        exec template in namespace
    except SyntaxError, e:
        raise SyntaxError(e.message + ':\n' + template)
    result = namespace[typename]

Pretty slick! The idea of executing the formatted code string in an isolated namespace, then extracting out the new type is very novel to me. For more details on the exec construct, check out this post by Armin Ronacher.

Next there’s some trickery about setting the __module__ of the new class to the module that actually invoked namedtuple:

    # For pickling to work, the __module__ variable needs to be set to the frame
    # where the named tuple is created.  Bypass this step in enviroments where
    # sys._getframe is not defined (Jython for example) or sys._getframe is not
    # defined for arguments greater than 0 (IronPython).
    try:
        result.__module__ = _sys._getframe(1).f_globals.get('__name__', '__main__')
    except (AttributeError, ValueError):
        pass

and then we’re done!

    return result

Easy, right?

Thoughts on the implementation

For me, the most interesting part of the above implementation was the dynamic evaluation of the code string in a namespace that existed solely for the purpose of that one evaluation. It emphasized to me the simplicity of Python’s data model: all namespaces, including modules and classes, really just reduce to dicts. Seeing the namedtuple usecase really illustrates the power of that simplicity.

With that technique in mind, I wonder if the fieldname validation couldn’t be simplified using a similar approach. Instead of python for name in (typename,) + field_names: if not all(c.isalnum() or c=='_' for c in name): raise ValueError('Type names and field names can only contain alphanumeric characters and underscores: %r' % name) if _iskeyword(name): raise ValueError('Type names and field names cannot be a keyword: %r' % name) if name[0].isdigit(): raise ValueError('Type names and field names cannot start with a number: %r' % name) the implementor might have said python for name in (typename,) + field_names: try: exec ("%s = True" % name) in {} except (SyntaxError, NameError): raise ValueError('Invalid field name: %r' % name) to test more directly and succinctly for a valid identifier. The drawback to this approach, though, is that we lose specificity in reporting the problem with the field name. Given that this is in the standard library, explicit error messages probably make the existing implementation a better bet.

Just a find away

Python users are fortunate enough to have a very readable standard library. Take advantage of it; it’s easy and satisfying to read the exact blueprint of the builtin modules you know and love.

fun, right?

  1. at least in Python <3.0 ↩
  2. because I’m sure you consider runtime construction of datatypes totally ↩